March 30, 2013

How to handle SSRS reports which will take long time

How to handle SSRS reports which will take long time

We know that there are/will be some reports which will take more time to render due to the many rows/transactions. This post will help you to show appropriate warning/error messages to the end user while running the report.

The number of records that are processed by report might be large and the user experience will be affected, because the client will be locked up if printing to the screen. 

In this case, you might want to return a warning message to the user that indicates that time to process the report might be long and confirm that they want to run the report. 

Another case could be where the number of records being processed is very large and a time-out might occur in report processing and clearly, we should not run this report.
In this case, we should not run the report and therefore, should return anSrsReportPreRunState::Error enumeration value with the error message.
In AX 2012, SSRS reports, through SrsReportRunController we can easily let the user know the report will take more time with warnings or error messages through preRunValidate method.

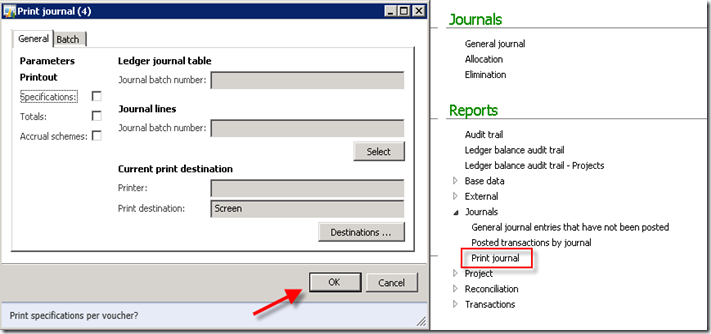
Example : General Journals report

Take the standard example of Print journal from General Ledger >> Reports >> Journal >> Print journal.

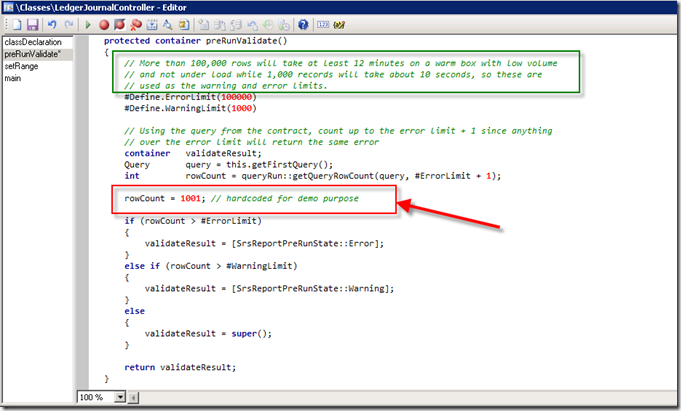
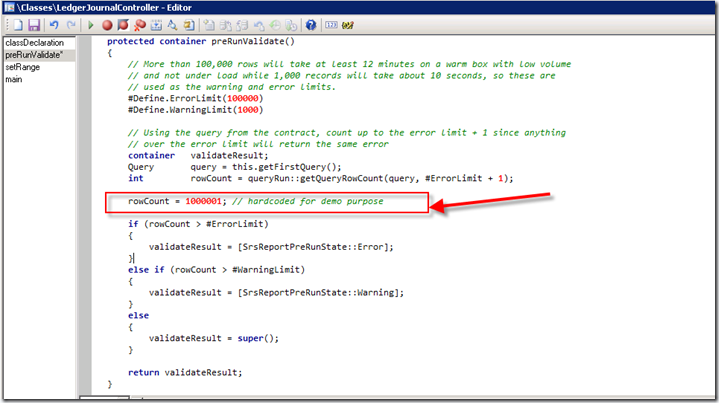
Use standard LedgerJournalController class to help you understand preRunValidate method: this validates container before running the report. Override this method to do custom pre-validation for any report. Typical use of this method will be to validate if the time taken to run the report is acceptable.
In this standard example: If the query is going to retrieve more than 1000 rows, a confirmation Box will be displayed to the user as shown below.

To get the confirmation box and for the sake of the demo/understanding: I have hardcoded the rows count to 1001 as shown below. There is a new static method in QueryRun::getQueryRowCount that will get the row Count of the query.

Please note: Remove hardcoded values later. This is hardcoded only for the sake of demo/Walk through
Clearly in the below standard example : warning limit is 1000 and error limit is 100000. 


image

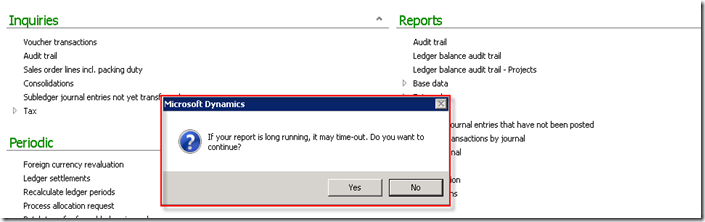
Run this report as shown below...

image


Here comes the confirmation Box: 
If your report is long running, it may time-out. Do you want to continue?

Note: In order to resolve/by pass this confirmation Box, a developer can change the macro #define.warningLimit to greater value

Example : #define.warningLimit(2000);

image

you can increase the row count : to 1000001.

image

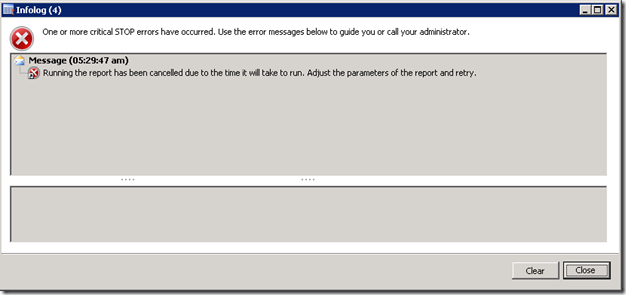
Let us run the report One more time as shown below.

image


Here comes the error message: Running the report has been cancelled due to the time it will take to run. Adjust the parameters of the report and retry.
In order to resolve this problem, Increase the ErrorLimit macro value in thepreRunValidate method.
Please note, it is not recommended to increase as it will take more time and your box cannot handle load.


Example : #define.ErrorLimit(150000);
image


Click below for original post...

-Harry 

March 20, 2013

Upload an image in a form window control

Upload an image in a form of window control

Hi Guys,
Here is the code for Upload an image in a form of window control in your Axapta world.
Go n Get It......

str filename;
FileNameFilter filter = ['JPG files','*.jpg'];
Bindata binData;
Image signatureImage = new Image();

super();

filename = Winapi::getOpenFileName(element.hWnd(), filter, '', "Upload your image", '', '');

binData = new BinData();

if (binData.loadFile(filename))
{
signatureImage = binData.getData();
FormWindowCOntrol.image(signatureImage);
FormWindowCOntrol.widthValue(signatureImage.width());
FormWindowCOntrol.heightValue(signatureImage.height());
element.resetSize();
element.unLock();
}

-Harry

March 18, 2013

Enterprise Portal development

Enterprise Portal development (AX 2009)

We Will complete this tutorial in four steps as:


Step 1 – the prerequisites
Step 2 – Understanding proxies
Step 3 – Visual Studio
Step 4 – Debugging in Visual Studio

Step 1 – the prerequisites:

Enterprise Portal must installed on the same server as Your development environment (Visual Studio). If possible, You should also consider to have EP set up on a 32 bit platform – meaning that the OS and Windows Sharepoint Services (WSS) is running in 32 bit mode.
In matters of EP development, running on 64 bit platform is the mother of all evil – examples on this will follow…
Enterpise Portal development tools must be installed. This can be done from the installation medias.
Generally the EP dev tools installs EP project- and control templates. Please note that the EP dev tools should be installed after installing Visual Studio 2008 – if not, the VS templates will most likely not be installed correctly. To ensure that the EP dev tools are successfully installed and that the Dynamics AX web project template is available from within Visual Studio, please do the following:
The Web Site project template AxWebProject.zip is installed in My Documents folder under Visual Studio 2008\Templates\ProjectTemplates\Visual Web Developer\CSharp and page and control templates AxWebpartPage.zip and AxWebUserControl.zip under Visual Studio 2008 \Templates\ItemTemplates\Visual Web Developer\CSharp.
If these files are not found under Your user profile, You will have to copy them from the user who installed the EP dev tools.
The Add-in is installed in Program Files\Microsoft Dynamics AX\50\EnterprisePortalTools and is added to the VS Add-in files path and enabled.
  1. You can check this in VS Tools->Options->Environment->Add-in/macros security, you should see Visual Studio Options dialog
    Visual Studio Options dialog
  2. In VS Tools -> Add-In Manager Dynamics AX Enterprise Portal Tools must be enabled. Visual Studio Add In manager dialog
    Visual Studio Add In manager dialog
To check if everything is installed corrected, when you create a new Web Site Project in VS 2008 C#, you should see Dynamics AX Web project template. After creating the project, in the solution explorer when you right click on app_code folder you should get Generate Proxies menu option.

Once this has been verified everything is good to go, but before firing up Visual Studio, You should check in which layer VS connects to AX. VS uses the business connector when connecting to AX. This means that You have to check that the BC is connecting to the layer of Your choice. In my case, we always use the CUS layer. By default the BC connects to AX using the USR layer. If You want to change this do the following:
  • On the server where EP is installed, click the “Start” button in Windows. Select “administrative tools” and enter the “Microsoft Dynamics AX Configuration Utility”.
  • Change the “Configuration Target” to “Business Connector”.
Select the “Developer” tab and change the “Application object layer to open” to “CUS” (or whatever You want) Remember to fill in the license code for that layer
DAX Configuration utility
DAX 2009 Configuration utility

Step 2 – Understanding proxies:

In order to being able to reference common AX types (Objects from the AOT – Classes, tables, methods and enums) AX needs to generate proxies for the objects that You want to use. These objects are defined in the AOT from Web->Web files->Static files->proxies. If You want other objects to be recognized by EP and Visual Studio, You need to edit this file manually. A guide how to do that can be found here:
http://msdn.microsoft.com/en-us/library/cc568275(v=ax.50).aspx
To deploy the proxies to EP, please do the following:
  • From the Microsoft Dynamics AX menu click Tools -> Development Tools-> Web development -> Proxies.
In the “Generate Proxies” window You will find two options for deploying the proxies
DAX Generate Proxies Dialog
  • Using the first option will deploy the proxies to the EP site automatically.
  • When using the second option the proxies will be deployed to a folder location of Your choice. From here You will have to copy the new proxies toC:\inetpub\wwwroot\wss\VirtualDirectories\80\App_Code\Proxies
  • Remember to also update the proxies from within Visual studio, in order to have VS recognize any of the new objects. From within You project in VS, right click the App_Code node and select “Generate Proxies”. You could also choose to copy the manually from the folder mentioned in the previous step.


Step 3 – Visual Studio

A new user control is easily created by right clicking Your project node and selecting “Add new item”. From the “Add new item” dialog choose “Dynamics AX user control

Visual Studio Add new item dialog
In order to add the new user control to the AOT. Right click the control and select “Add to AOT”.
Once added to the AOT changes to the control will automatically be submitted to AX. Once AX recognizes a change AX will update the control automatically on the EP site. However if running in 64 bit mode, this will not work! You can work around this in two ways:
  1. From a command prompt You can run the D:\Microsoft Dynamics AX\50\Setup\AxUpdatePortal.exe command. (The file may be located elsewhere in Your environment). Running this command will deploy all web related changes to all EP sites.
    http://msdn.microsoft.com/en-us/library/dd261467(v=ax.50).aspx
  2. Running the AXUpdatePortal command may be very timeconsuming. You may find it more useful to manually copy Your usercontrol  to Your EP site. The default path for the EP site is: C:\Program Files\Common Files\Microsoft Shared\Web Server Extensions\12\TEMPLATE\LAYOUTS\ep. You may want to consider writing a small script to help You automate this process just a little bit.

Step 4 – Debugging in Visual Studio

Ofcourse You will want to be able to debug Your  code from within Visual Studio. In order to do so, there are a few things You need to know:
  • Changes made to your usercontrols are automatically updated at the EP site when running on a 32 bit platform. If running on a 64 bit platform, You will have to update EP manually. The process for doing so is described above.
You will have to change the debugging start options. Right click Your project and select “properties->Start options”. In the start options dialog enable the “start url” radio button:
Visual Studio Debugger Start Options
and fill in the complete url for the page You want to hit on startup. This page is best found by browwing the actual EP site.
In the “use custom server” fill in the base url for the EP site. This can be fetched from within AX by entering  administration->Setup->Internet->Enterprise portal->web sites

Common issues

One of the most annoying things about working with EP related development is that You may quite often experience that EP causes Visual Studio to crash
EP Tools causes VS to crash
The only working fix that I know of, is to create a new solution/website and have Your content transferred to that website. When the problem reoccurs the procedure has to be repeated.

-Harry

March 15, 2013

Dynamics AX – Form lookups and how they work

There are few different ways to achieve a lookup field on a form.
1.     Create an Extended data type – EDT123


2.     Create a table Table123
3.     Add EDT123 to the table and the Description EDT field
4.     Go back to the EDT and create a relation between table123.EDT123 and the EDT123
5.     Automatically when the EDT field is added to another table lets say CustTable a lookup displaying the values from table123 will be displayed in the drop down.
6.     Now let’s say you want to add the description field to the lookup as well. Add the description field to the AutoLookup field group on the table. Now the lookup will display EDT123 and the description field from table123.

That is a simple way to create a lookup. Another way to create a lookup is to write a dynamic lookup on the table in which the data is coming from. This method will be a static method and will require the passing of arguments – typically the formstringcontrol that is to be the point of lookup. I prefer this method and use it often.

This a very simple example of a static lookup from a table


static void lookupTruckLoadIdEndingInv(FormStringControl  _ctrl)
{
    SysTableLookup          sysTableLookup  = SysTableLookup::newParameters(tablenum(WfsRMTruckLoadStatus), _ctrl);
    Query                   query           = new Query();
    QueryBuildRange         qbr;
    ;

    query.addDataSource(tablenum(WfsRMTruckLoadStatus));

    sysTableLookup.addLookupfield(fieldnum(WfsRMTruckLoadStatus, truckLoadId ));

    query.dataSourceTable(tablenum(WfsRMTruckLoadStatus)).addRange(fieldnum(WfsRMTruckLoadStatus,retTransferred)).value(SysQuery::value(NoYes::No));

    sysTableLookup.parmQuery(query);
    sysTableLookup.performFormLookup();
}

Joins can be peformed as well to pull back the desired data so you are not limited to querying on one table to return the proper data back to your lookup

static void lookupSettledTruckLoadIdCashier(FormStringControl  _ctrl)
{
    SysTableLookup          sysTableLookup  = SysTableLookup::newParameters(tablenum(WfsRMTruckLoadHeader), _ctrl);
    Query                   query           = new Query();
    QueryBuildRange         qbr;
    queryBuildDataSource    qbdsTruckLoadStatus,qbdsTruckLoadHeader,qbdsTenderSlipHeader;
    ;

    qbdsTruckLoadHeader = query.addDataSource(tablenum(WfsRMTruckLoadHeader));

    qbdsTruckLoadStatus         = qbdsTruckLoadHeader.addDataSource(tablenum(WfsRMTruckLoadStatus));
    qbdsTruckLoadStatus.relations(true);

    qbdsTruckLoadStatus.addRange(fieldnum(WfsRMTruckLoadStatus,settled)).value(enum2str(NoYes::No));
    qbdsTruckLoadStatus.addRange(fieldnum(WfsRMTruckLoadStatus,HHTruckLoadIdEnded)).value(enum2str(NoYes::Yes));
    qbdsTruckLoadStatus.addRange(fieldnum(WfsRMTruckLoadStatus,RetTransferred)).value(enum2str(NoYes::Yes));

    qbdsTenderSlipHeader         = qbdsTruckLoadStatus.addDataSource(tablenum(wfsRMTenderSlipHeader));
    //qbdsTenderSlipHeader.relations(true);
    qbdsTenderSlipHeader.addLink(fieldnum(WfsRMTruckLoadStatus, truckLoadId),fieldnum(wfsRMTenderSlipHeader, truckLoadId));
    qbdsTenderSlipHeader.joinMode(joinMode::NoExistsJoin);

    sysTableLookup.addLookupfield(fieldnum(WfsRMTruckLoadHeader, truckLoadId));
    sysTableLookup.addLookupfield(fieldnum(WfsRMTruckLoadHeader, routeId));
    sysTableLookup.parmQuery(query);
    sysTableLookup.performFormLookup();
}


Another way is to create an actual form and call it in a method on the table. You will still need to pass in the formstringcontrol object but in this case you will be calling an actual existing form that you have created. Now why do this? Well one reason may be that you want to be able to filter on a specific field in the lookup that maybe you could not on a typical lookup or maybe you need to add a field to the lookup that would otherwise not be possible like you can add a display method to a lookup but maybe you want to see the field referenced in the display method and have the ability to sort on the field or filter on the field. For example, like DirPartyTable.Name. Sure, you can access it using a display method but maybe you want to see it in your lookup and be able to filter on it.
So you will create a form and call it like a lookup so you can have all the the filtering of a standard form

public client static void WfsRMlookupEmplIdCashier(Object _ctrl)
{
    Args        args;
    FormRun     formRun;
    ;

    args = new Args();
    args.name(formstr(WfsRMEmplIdLookupCashier));
    args.caller(_ctrl);
    formRun = classfactory.formRunClass(args);
    formRun.init();
    _ctrl.performFormLookup(formRun);
}

The standard lookups present in AX like the item number lookup and the customer lookup are very interesting in that you only see one field on the relation but no fields in the autolookup. In these cases the lookup fields are coming from the standard indexes on the table. Take note of what you see in the itemId lookup when unchanged and then reference the indexes coincidence not really. this can apply to any new lookup you create as well.
You can also override the lookup on the datasource - field of a form or an actual field string edit control on a form and perform a lookup
Form design object

public void lookup()
{

    SysTableLookup        sysTableLookup;
    Query                 query=new Query();
    QueryBuildDataSource  qbds;

    ;
    sysTableLookup=SysTableLookup::newParameters(tablenum(Dimensions),this);

    sysTableLookup.addLookupfield(fieldnum(Dimensions,Num));
    sysTableLookup.addLookupfield(fieldnum(Dimensions,Description));

    qbds = query.addDataSource(tablenum(Dimensions));

    qbds.addRange(fieldnum(Dimensions, DimensionCode)).value(queryValue(COSAllowedDimensions::getAllowedDimensionValue(sysDim)));

    sysTableLookup.parmQuery(query);
    sysTableLookup.performFormLookup();
}
//Lookup from a field on the form data source
public void lookup(FormControl _formControl, str _filterStr)
{
    Args    args;
    FormRun formRun;
    SysTableLookup      sysTableLookup = sysTableLookup::newParameters(tablenum(InventTable),_formControl);
    Query               query = new Query();
    QueryBuildDataSource     queryBuildDataSource;
    QueryBuildRange     queryBuildRange;
    ;
    sysTableLookup.addLookupfield(fieldnum(InventTable,ItemID));
    sysTableLookup.addLookupfield(fieldnum(InventTable,ItemName));
    sysTableLookup.addLookupfield(fieldnum(InventTable,ItemGroupID));
    sysTableLookup.addLookupfield(fieldnum(InventTable,NameAlias));
    sysTableLookup.addLookupfield(fieldnum(InventTable,ItemType));
    sysTableLookup.addLookupfield(fieldnum(InventTable,DimGroupID));

    queryBuildDataSource = query.addDataSource(tablenum(Inventtable));
    queryBuildRange = queryBuildDataSource.addRange(fieldnum(InventTable,ItemGroupID));
    //FGL, FGR, Returns
    queryBuildRange.value('xxx');

    queryBuildRange = queryBuildDataSource.addRange(fieldnum(InventTable,ItemGroupID));
    queryBuildRange.value('yyy');

    queryBuildRange = queryBuildDataSource.addRange(fieldnum(InventTable,ItemGroupID));
    queryBuildRange.value('Returns');

    sysTableLookup.parmQuery(query);
    sysTableLookup.performFormLookup();

}
-Harry

March 14, 2013

Exporting data to Excel from axapta x++

Exporting data to Excel from axapta x++


Hi All!
Sometimes we need to export data from Microsoft Dynamics AX to Excel using axapta x++ code and we don't know how to do this...
Exists some differents ways to do this, but I think the best way is using the SysExcel class of Dynamics AX and its related.
The only problem I found using this class... is that it can not be used in a batch process.
Sample code:


static void TheaxaptaCreateExcel(Args _args)
{
   SysExcelApplication  xlsApplication;
   SysExcelWorkBooks    xlsWorkBookCollection;
   SysExcelWorkBook     xlsWorkBook;
   SysExcelWorkSheets   xlsWorkSheetCollection;
   SysExcelWorkSheet    xlsWorkSheet;
   SysExcelRange        xlsRange;
   CustTable            custTable;
   int                  row = 1;
   str                  fileName;
   ;
   //Filename
   fileName = "C:\\Test.xlsx";
   //Initialize Excel instance
   xlsApplication           = SysExcelApplication::construct();
   //Open Excel document
   //xlsApplication.visible(true);
   //Create Excel WorkBook and WorkSheet
   xlsWorkBookCollection    = xlsApplication.workbooks();
   xlsWorkBook              = xlsWorkBookCollection.add();
   xlsWorkSheetCollection   = xlsWorkBook.worksheets();
   xlsWorkSheet             = xlsWorkSheetCollection.itemFromNum(1);
   //Excel columns captions
   xlsWorkSheet.cells().item(row,1).value("Account Num");
   xlsWorkSheet.cells().item(row,2).value("Name");
   row++;
   //Fill Excel with CustTable AccountNum and Name fields (only 20 records)
   while select custTable
   {
      if(row == 20)
        break;
      xlsWorkSheet.cells().item(row,1).value(custTable.AccountNum);
      xlsWorkSheet.cells().item(row,2).value(custTable.Name);
      row++;
   }
   //Check whether the document already exists
   if(WinApi::fileExists(fileName))
      WinApi::deleteFile(fileName);
   //Save Excel document
   xlsWorkbook.saveAs(fileName);
   //Open Excel document
   xlsApplication.visible(true);
   //Close Excel
   //xlsApplication.quit();
   //xlsApplication.finalize();
}

-Harry

March 12, 2013

How to Connect the Host Hard Drive to a VirtualBox OS

How to Connect the Host Hard Drive to a VirtualBox Guest OS

VirtualBox from Oracle is an amazing and free application if you like testing different operating systems without messing up your original operating system or Master Boot Record (MBR). VirtualBox is also useful if you like to test operating systems before their final release. 
However, most people want to connect their host hard disk drives to the guest operating system. For your information, the host OS is the operating system you’re actually using, while the Guest OS refers to the OS virtually installed inside VirtualBox. 

We’ve used Windows 7 as the host operating system and Windows XP as the guest OS. Let’s begin.

Step 1 : Install Guest Additions

1start How to Connect the Host Hard Drive to a VirtualBox Guest OS

First off, you need to start up the operating system you want to connect your hard disk drives to. Choose your OS and click the start button. When the OS is ready, click Devices  

> Install Guest Additions.

2installguest How to Connect the Host Hard Drive to a VirtualBox Guest OS.

Clicking this will prompt the Guest Addition setup menu on Windows XP (Guest OS). Install the guest addition and reboot your guest OS as required.

3guestadditionsetup How to Connect the Host Hard Drive to a VirtualBox Guest OS

Step 2 : Share Folder

When installed and rebooted, click Devices again and choose Shared Folders.

4 How to Connect the Host Hard Drive to a VirtualBox Guest OS

A box will open. Simply click the add icon (+ sign) on the right. From the Folder Path pull down menu, click Other.

5addshare How to Connect the Host Hard Drive to a VirtualBox Guest OS

A folder browser (similar to Windows Explorer) will open up. From here, you can select any hard drive or any folder inside a hard drive. Upon selecting click OK.

6select How to Connect the Host Hard Drive to a VirtualBox Guest OS

Step 3 : Connect to Shared Folder

Now, VirtualBox has shared the selected hard drive/folder (in our case, E drive) with the guest OS. You now need to access it. To do so, go to My Computer and in Other Places, right click on My Network Places and choose Map Network Drive.

7map network drive How to Connect the Host Hard Drive to a VirtualBox Guest OS

Here in the Drive box, you have to select a Drive letter for the folder/hard disk drive you’re connecting to. You can choose randomly or select as your choice from the pull down menu. From the Folder box, click the browse button and click the plus sign on the left of ‘VirtualBox Shared Folders’ and then ‘\\vboxsvr’.
This will show you a list of folders or hard drives shared with the guest OS. Click the one you want to connect to and click OK. On the Map Network Drive, make sure the Reconnect at logon checkbox is checked if you want to automatically connect to this drive each time your guest OS starts up.

8add How to Connect the Host Hard Drive to a VirtualBox Guest OS

Step 4 : Access Shared Folder

You’re done! Now, go to My Computer and you’ll be able to access the hard disk drive of your computer right from the guest operating system installed inside VirtualBox.
9network drives How to Connect the Host Hard Drive to a VirtualBox Guest OS

I hope it was easy for you to follow this tutorial and now you are able to access your hard disk and install any software from your local hard disk drive.

-Harry

March 09, 2013

Installing Microsoft SharePoint Foundation

Installing Microsoft SharePoint Foundation

Note: Microsoft SharePoint Foundation (MSF) can be only installed on a 64-bit hardware

Recently i installed MSF on my local system , I just sharing my exp about how to install MSF. Installation and configuration of Microsoft SharePoint Server 2010. We will complete this tutorial in four main steps as:
      1.     Hardware and Software requirements
      2.     Pre-requisites
      3.     Installation
      4.     Post Setup Configuration


1.     Hardware and Software requirements

Microsoft SharePoint Foundation (MSF) can be only installed on a 64-bit hardware and Microsoft provides the detailed hardware and software requirements in the following TechNet article.This is the new name for Windows SharePoint Services V4.
http://technet.microsoft.com/en-us/library/cc262485(office.14).aspx#section2

2.     Pre-requisites

In this release Microsoft has included a Prerequisite Installer (Preparation Tool) which will take care of all the pre-requisites which are required to setup a SharePoint Server.The tool would connect to Internet to download and install any prerequisites as well as enabling and configuring any Windows features and roles required by setup. Also the administrator can override this if the necessary software is already present in the hard disk or in a network location.
The Preparation Tool executable, Prerequisiteinstaller.exe, is located at the root of the setup folder. It can also be launched from the setup splash screen.When you run the Prerequisiteinstaller.exe /? , the following screen is shown which will list the command-line parameters that can be used with this executable.


You can also install the pre-requisite from a folder if it is already downloaded from the internet and the SharePoint server doesn’t have internet access.

C:\setup\prerequinstaller.exe /IDFX:c:\GenevaFramework.amd64.msi

It is possible to include multiple file location parameters for the different components. In the following example, we've also added local file location parameter for both the IDFX and Sync framework:

C:\setup\prerequinstaller.exe /IDFX:c:\GenevaFramework.amd64.msi /SYNC c:\sync.msi

To install the Pre-requisites, run the prerequisiteinstaller.exe in the installation media of SharePoint or run the Splash which will provide you the following screen.


Click on the “Install Software prerequisites” option which will start the installation of the necessary pre-requisites.


You can get the download link for each of the required product when you click Learn more about these prerequisites in the above screen.

Click Next will start the download and installation of pre-requisites from the internet.


Accept the EULA and click Next and this will start the installation of the required product.


Some of them may require a Restart and the pre-requisite installer will continue once the system is restarted.


There is a link called “Review the log file” in the above screen which will help to find out any issue with the installation of the Pre-requisites.Once the installation is complete, you will see the following screen and it means that all the required Pre-requisites are installed and configured on the server and you can start the installation of SharePoint.

Installation of SharePoint Server 2010

When installing SharePoint Foundation, there are primarily three setup options.Following is a short description of each type of installation:

Standalone Installation:

  SQL Server 2008 Express Edition is the database type automatically installed (instead of Windows Internal Database/SQL Server 2005 Embedded Edition used in Windows SharePoint Services 3.0).   This is almost a “one-click” installation, no questions are asked during setup or during Post Setup Configuration Wizard (PSConfig)
A Web application and team site collection are automatically created in the newly created farm. The search service is started automatically.
Cannot add servers to join a farm.
When the installation is complete, the browser opens taking you to a newly created site collection. Installer is not prompted for farm passphrase, it is automatically generated.
Standalone Same as Basic installation, except it allows changing installation directory location. Complete SQL Server 2005 SP2/SQL Server 2008 is the database type, not installed by setup.
Administrator can pick whether or not to create a site and the site template to use.
Prompted for farm passphrase during PSConfig phase of installation. The farm passphrase will be discussed later in this document.
To run setup you must at minimum be a local administrator on the computer where SharePoint Server 2010 is installed.


Run the Splash from the setup media which will show the above screen and click on “Install SharePoint Foundation” which will start the installation process.


-Harry

March 08, 2013

Installing Oracle Database 11g Release 2

Step-by-step instructions for installing Oracle Database 11g Release 2

Here are step-by-step instructions for installing Oracle Database 11g Release 2 on Windows 7. It’s provided in response to questions posted on my step-by-step instructions for installing Oracle 11gR1 on Windows 7. For reference, I posted the former because it didn't work without intervention. I hadn't updated step-by-step instructions because Oracle Database 11g Release 2 has always worked for me when installing on Windows 7.
A number of students and blog readers have mentioned that it didn't work for them. My guess is that they had configuration issues within the Windows 7 environment. There are some Windows 7 configuration caveats before you perform this installation, and they are:
Windows 7 Configuration Steps
  1. Make sure you have at least 3 GB of memory on your Windows PC, or that you can allocate 4 GB of memory to your virtual machine (the latter typically requires 8 GB of real memory to avoid extensive disk caching of memory).
  2. Install Oracle’s SJDK and run time for Java 6 or 7 on Windows 7 (I installed Java 7). Although either work with the database, you need the Java 6 SDK 32-bit version (at least SJDK 1.6.0_4) for Oracle SQL Developer. This means you need to download the 32-bit version even when you’re installing the 64-bit Oracle Database 11g version.
  3. Disable Microsoft’s User Access Controls (UAC). I blogged about a set of Windows 7 gripes, and the second point shows you the screen shots that let you disable UAC on Windows 7.
  4. Configure your C:\Windows\System32\drivers\etc\hosts file. Use lines 1 through 3 when you’re using a DHCP IP address, and lines 1 through 4 when you’re using a static IP address.  Please note that the hostnameneeds to be lowercase.
1 127.0.0.1 localhost 
2 ::1 localhost
3 127.0.0.1 agarwalax theaxapta.blogspot.com
4 172.26.126.131 agarwalax theaxapta.blogspot.com 


  1. Create a user account name that doesn’t have a white space, like McLaughlinM in the screen shots, and assign it Administrator privileges.
  2. The Oracle Enterprise Manager (OEM) uses port ranges above 5,000, which according to Microsoft requires that you set MaxUserPort key in the Windows Registry. You can find more details at this Microsoft Support page. Personally, I haven’t found this necessary and after adding it to please somebody without setting it everything ran fine in Windows 7.

Registry key: HKEY_LOCAL_MACHINE\SYSTEM\CurrentControlSet\Services\Tcpip\Parameters
Value Name
MaxUserPort

Value Type
DWORD

Value Data
65534

Value Range
5000-65534 (decimal)

Value Default
0×1388 (5000 decimal)

Description
This parameter controls the maximum port number that is used when a program requests any available user port from the system. Typically, ephemeral (short-lived) ports are allocated between the values of 1024 and 5000 inclusive. After the release of security bulletin MS08-037, the behavior of Windows Server 2003 was changed to more closely match that of Windows Server 2008 and Windows Vista. For more information about Microsoft security bulletin MS08-037

Oracle 11g Release 2 Installation Steps

  1. The Oracle Database 11g Release 2 files are broken down into two zip files on the Oracle site. That means you need to download both files, and then expand them into an installation directory. I called my installation directory C:\OracleInstall, but you can call it whatever works for you. Here’s a screen shot of the directory after expanding both compressed files (done with WinZip 15).

You should notice that the two expanded compressed files put everything into a database directory (or folder). Within the installation folder (C:\OracleInstall\database), you double click on the oui icon to launch (start) the Oracle Universal Installer. It’ll open a command prompt that may dwell on the screen for a few seconds up to maybe fifteen seconds.


  1. It’s a good idea to provide an email address for security updates no matter what. You can unchecked the box if you don’t want updates via Oracle Support Services. Click the Next button to continue.


  1. Most developers want to Create and configure a database. If that’s your desire, leave the default radio button checked. Click the Next button to continue.


  1. Most developers install their test instance on a desktop or laptop. If that’s your desire, leave the defaultDesktop Class radio button checked. Click the Next button to continue.


  1. These are default settings and generally the easiest to use. I’d suggest you change the Character Set drop down to Unicode. Then, enter a password twice. Oracle requires that you use at least one capital letter and one number in a 6 character or more long password. Click the Next button to continue.


  1. The next screen is a progress bar that checks for prerequisites. You shouldn't have to do anything here because it automatically advances you to the next dialog screen. This generally takes less than a minute to run but can take two or so. If you’re much beyond 3 minutes there may be a resource problem with your Windows PC or virtual machine.


  1. This shows you all the selected values for the installation. Unless you want to abort the installation, click the Finish button to proceed.


  1. This screen is the main progress bar, and you’ll be here somewhere between 5 and 10 minutes. The downside is that there are some dialog that will popup during this phase and you need to authorize them, so it’s a bad time to take a break.


  1. The first popup screen requires you to authorize the Java run time to call home. You should click the Allow Access button to proceed.


  1. When the progress bar starts configuring the instance, failures can occur. The first may occur during the network configuration, which typically happens if you didn't preconfigure the hosts file. You don’t need to do anything but watch here unless the installer triggers an error.


  1. The following progress bar is launched by the Oracle Database Configuration Assistant. It typically runs without a problem. You don’t need to do anything but watch here unless the installer triggers an error. This takes a few minutes, and unfortunately requires you to stick aroung to again authorize Java.


  1. The second popup screen requires you to authorize the Java runtime to call home. You should click theAllow Access button to proceed.


  1. The third and last popup screen asks you to whether you want to open other scheme. Generally, you should click the OK button to proceed.


  1. The next dialog shows you that the network and database instances are configured. It’s also running the OEM (Oracle Enterprise Manager) installation. You can wait here but it won’t be a long wait.


  1. This is the last dialog and says you’ve installed Oracle Database 11g Release 2 successfully. You can theClose button to complete the installation.

-Harry

March 07, 2013

Document handling via X++

In my previous post  Document handling In Dynamics ax, I post step by step tutorial to use base functionality of document handling. Today I Shared dirty code for document handling via X++ code.
Well, Document handling a great feature of Axapta; It really just depends on what your application requires. For instance, one application was based upon the sales order having a certain document attached to a sales order based on upon a custom enumeration.  So the button has a name like an invoice declaration for instance. 
If the button is clicked two menu options appear 
– Add document or 
- View document; 

*If the add document button is clicked
The select file dialog appears and the user selects a file and clicks OK. At this point, the file is written to the document handling table with the custom enumeration marked as “Invoice declaration”. 

*If the view document option is selected and there is a file to view, 
The standard documentation form will appear and the document will automatically be launched for viewing. 

What I decided to do is was find the lasted record with the enumeration set as the button that is being clicked. I pass RecId of this record using args to the Document handling form so when the form is launched I have access to the recId of the record I want to see. I set a class declaration variable of type Int64 to the recId of being passed in so I have access to the variable all over the form. This way I can use the variable in conditional statements to determine if I want to execute code. Below I will demonstrate how to insert a record in the document handling form and how I view a document of selection from the document handling form from the calling form.

Loading a document from the sales order to the document handling table

    Args                            args = new args();
    formrun                         FormRun;
    filenameSave                    filename;
    Args                            args1 = new args();
    wfsEMSalesOrderDocumentation    wfsEMSalesOrderDocumentation;
    docuref                         docuref;
    form                            form2;
    FilenameFilter                  _conFilter;
    filename                        file;
    recid                           docuvaluerecid;
    docuvalue                       docuvalue;
    int                             hwnd;//wfs ctodd 6/21/2012
    ;

    if(SalesTable)
    {
        _conFilter = ['All FIles','*.*'];
         hWnd = element.hWnd();
        file = WinAPI::getOpenFileName(infoLog.hWnd(),_conFilter,'','Select Document Path');
        if(file)
        {
            ttsbegin;
            docuref.TypeId = "File";
            docuref.Name   = "Commercial Invoice";
            docuref.Notes  = docuRef.Notes;
            docuRef.Restriction  = DocuRestriction::External;
            docuref.RefCompanyId = SalesTable.dataAreaId;
            docuref.WfsExportType = wfsexporttype::CommercialInv;
            docuref.RefTableId   = tablenum(SalesTable);
            docuref.RefRecId     = SalesTable.RecId;
            docuref.insert();

           docuvalue.initValue();
           docuvalue.insert();
           docuref.ValueRecId = docuvalue.RecId;
           docuref.update();
           docuvaluerecid = docuvalue.RecId;

           select forupdate docuvalue where docuvalue.recid == docuvaluerecid;
           docuvalue =  docuvalue::writeDocuValue(docuref,file);
           ttscommit;
      }

Viewing a file to the document handling table from the sales order table

     Args                            args = new args();
    formrun                         FormRun;
    filenameSave                    filename;
    Args                            args1 = new args();
    wfsEMSalesOrderDocumentation    wfsEMSalesOrderDocumentation;
    docuref                         docuref;
    form                            form2;
    FilenameFilter                  _conFilter;
    filename                        file;
    recid                           docuvaluerecid;
    docuvalue                       docuvalue;
    ;

    if(SalesTable)
    {
        args = new Args();
        args.name(formstr(docuview));
        select reverse docuRef  order by createdDateTime 
where Docuref.RefTableId == salesTable.TableId 
     && docuRef.RefRecId == salesTable.RecId 
     && docuRef.WfsExportType == wfsExportType::CommercialInv;

        args.record(docuRef);
        args.parm(int642str(docuRef.RecId));
        args.caller(this);

        FormRun = classfactory.formRunClass(args);
        FormRun.init();
        FormRun.run();
        FormRun.wait();

        salesTable_ds.reread();
        salesTable_ds.refresh();
    }


When viewing my document I want to pass in the record I want to see from the document handling form
//This is the document handling form init method

void init()
{
    #define.ctrlBuildAdd('ctrlAdd')
    DocuType                            docuType;
    FormBuildMenuButtonControl          menuCtrl;
    FormBuildFunctionButtonControl      itemButtonCtrl;

    if (! infolog.parmDocuHandlingActive())
    {
        throw(error("@SYS60737"));
    }
    if (infolog.parmDocu().isDocuViewSet())
    {
        infolog.parmDocu().setActive();
        throw Exception::Info;
    }
    optionView = new DocuOptionView();
    optionView.getLast();

    DocuType::createDefaults();
    docuTypeIdFile = DocuType::typeFile();

    menuCtrl = this.form().design().control(#ctrlBuildAdd);
    while select docuType
        index TypeIdx
    {
        itemButtonCtrl = menuCtrl.addControl(FormControlType::MenuFunctionButton,docuType.TypeId);
        itemButtonCtrl.menuItemType(MenuItemType::Action);
        itemButtonCtrl.menuItemName(menuitemactionstr(DocuActionNew));
        itemButtonCtrl.text(docuType.TypeId);
    }

//Here I set my variable exportRecId to the recId of the parameter I passed in using args
    if(element.args().caller().name() == formstr(wfsEMExportSales)) // dms
 {
 exportRecId = str2int64(element.args().parm());
 }
    super();
    link.enabled(false);
    multiPaste.enabled(false);

    formSplitter_Y = new SysFormSplitter_Y(grpSplit,grpRefGrid,this);
}

Here is the init method on the datasource DocuRef I need to create a query range

void init()
{
    Query           q;
    QueryBuildDataSource qB;
    super();

    q = new Query();
    qB = q.addDataSource(tablenum(DocuRef));
    criteriaRefCompanyId    = qB.addRange(fieldnum(DocuRef,RefCompanyId));
    criteriaRefTableId      = qB.addRange(fieldnum(DocuRef,RefTableId));
    criteriaRefRecId        = qB.addRange(fieldnum(DocuRef,RefRecId));
    criteriaCreatedBy       = qB.addRange(fieldnum(DocuRef,CreatedBy));

    I create a range for the recId of the record being passed in. This is checked with a condition
 We don't want to create the range if no value exists in exportRecId

    if(exportRecId)
 {
 recIdRange = qB.addRange(fieldnum(DocuRef,recId));
 }
    element.setRangeCreateId(optionView.parmShowAllUser());
    this.query(q);

    this.cacheAddMethod(tablemethodstr(DocuRef, isValueAttached));
}

The executeQuery of DocuRef which will perform the query execution of the form for that datasource

void executeQuery()
{
    if (element.isActualFound())
    {
        criteriaRefCompanyId.value(queryValue(actualCompanyId));
        criteriaRefTableId.value(queryValue(actualTableId));
        criteriaRefRecId.value(queryValue(actualRecId));
    }
    else
    {
        criteriaRefCompanyId.value(queryValue(naStr()));
        criteriaRefTableId.value(queryValue(naInt()));
        criteriaRefRecId.value(queryValue(naInt()));
    }

    If my variable has a value then we pass that value to the range I created in the 
 in the init method
   
 if(exportRecId)
 {
 recIdRange.value(SysQuery::value(exportRecId));
 }

    super();
}

Again I use the variable exportRecId to determine if the document should automatically
be viewed when launching from the sales order form. So basically if I have the recId
from a caller I want the document to be automatically launched

void run()
{
    element.setCaption("@SYS26830");

    filter.selection(optionView.parmShowAllUser());
    showOnlyRef.value(optionView.parmShowOnlyRef());
    showImage.value(optionView.parmShowImage());
    this.setShowRef();
    this.setShowImage();
    if(exportRecId)
 {
 showImage.value(1);
 this.setShowImage();
 }
    super();
}
-Harry